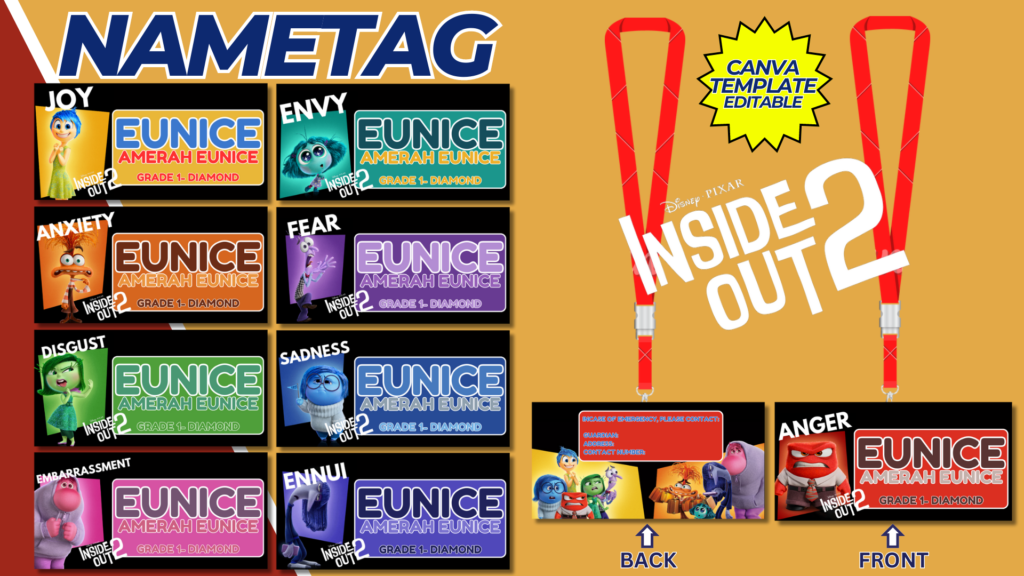
Inside Out 2 Nametag Template
Creating a fun and engaging nametag template inspired by “Inside Out 2” is a great way to add some excitement and personalization to various settings like classrooms, events, and parties. These nametags can feature characters from the movie and incorporate vibrant colors and playful designs that resonate with kids. Here’s a detailed guide on how to design and use these nametags effectively.
1. Purpose and Use of Nametags
Nametags are useful in various scenarios:
- Classrooms: Helps teachers and students learn each other’s names quickly.
- Events and Parties: Facilitates introductions and helps guests feel more comfortable.
- Workshops and Seminars: Assists in networking and creating a friendly atmosphere.
2. Materials Needed
- Computer with design software (Canva, Adobe Spark, Microsoft Word, etc.)
- Printer
- Cardstock or heavy paper
- Laminator (optional)
- Scissors or a cutting machine (e.g., Cricut)
- Lanyards, safety pins, or adhesive clips
3. Designing the Nametag Template
Size and Shape:
- Standard sizes for nametags are 3×2 inches or 4×3 inches. You can choose any shape, but rectangular or oval shapes are most common.
Character Selection:
- Select characters from “Inside Out 2” such as Joy, Sadness, Anger, Disgust, and Fear. Each nametag can feature a different character to add variety and fun.
Elements to Include:
- Character Image: A clear, high-quality image of the character.
- Name Field: Space for the person’s name. Use a large, readable font.
- Background: Bright and colorful background that complements the character.
- Additional Details: Optionally, include fields for additional information such as the person’s role, favorite activity, or a fun fact.
Step-by-Step Design Process in Canva:
- Open Canva:
- Sign in to Canva or create a free account.
- Click on “Create a design” and choose “Custom dimensions” based on your desired nametag size.
- Layout Setup:
- Use grids or frames to organize the elements on the nametag.
- Add a border to define the edges of the nametag clearly.
- Add Character Images:
- Upload images of “Inside Out 2” characters.
- Position the character image on one side of the nametag.
- Insert Text Fields:
- Add a text box for the name. Use a bold, legible font.
- Include additional text boxes for other details if needed.
- Background and Colors:
- Choose a background color or pattern that complements the character.
- Use bright and cheerful colors to make the nametag appealing to children.
- Download and Print:
- Once your design is complete, download it as a PDF for high-quality printing.
- Print the nametags on cardstock or heavy paper for durability.
- Cutting and Laminating:
- Use scissors or a cutting machine to cut out the nametags.
- Optionally, laminate the nametags to make them more durable and reusable.
4. Character Profiles for Nametags
Here are some profiles for the “Inside Out 2” characters to add to your nametag designs:
- Joy:
- Image: Joy with her bright, cheerful expression.
- Background: Yellow or a sunny pattern.
- Additional Details: “Role: Bringer of Happiness” or “Favorite Activity: Spreading Joy.”
- Sadness:
- Image: Sadness with her thoughtful look.
- Background: Blue or a calm, wavy pattern.
- Additional Details: “Role: Thoughtful Reflector” or “Favorite Activity: Contemplating.”
- Anger:
- Image: Anger with his fiery expression.
- Background: Red or a flame pattern.
- Additional Details: “Role: Protector of Fairness” or “Favorite Activity: Expressing Opinions.”
- Disgust:
- Image: Disgust with her sassy look.
- Background: Green or a zigzag pattern.
- Additional Details: “Role: Taste Tester” or “Favorite Activity: Being Stylish.”
- Fear:
- Image: Fear with his worried expression.
- Background: Purple or a spooky pattern.
- Additional Details: “Role: Safety Monitor” or “Favorite Activity: Keeping Safe.”
5. Using the Nametags
Classrooms:
- Distribute nametags on the first day of school to help everyone learn names quickly.
- Use character nametags to create group assignments based on the characters, making learning more interactive.
Events and Parties:
- Hand out nametags as guests arrive to make introductions easier.
- Use nametags to organize games or activities, such as character-themed scavenger hunts.
Workshops and Seminars:
- Provide nametags at the registration desk for easy identification.
- Encourage participants to add a fun fact about themselves to their nametag to spark conversations.
6. Engaging Activities with Nametags
Character-Based Activities:
- Role Play: Children can role-play based on the character on their nametag, encouraging creativity and empathy.
- Character Match: Create a matching game where children find others with the same character or a complementary character for team activities.
Creative Projects:
- Nametag Design Contest: Let children design their own nametags featuring their favorite characters.
- Art Station: Set up an art station where children can color and decorate their nametags.
Interactive Learning:
- Character Traits Discussion: Discuss the traits of each character and relate them to real-life emotions and situations.
- Story Time: Incorporate the characters into stories and activities that teach emotional intelligence and understanding.
Conclusion
Designing and using “Inside Out 2” nametags can make introductions, organization, and learning more enjoyable for children and adults alike. By following this detailed guide, you can create engaging, colorful, and personalized nametags that not only help with name recognition but also add a fun element to any event or setting. Use these templates to foster a sense of belonging and excitement, making every occasion special and memorable.
NOTE: Isa isahin nyo na lang ung LINK anjan din kasi ung mga MATERIALS na pwede magamit at ung FILES.
Materials & INSIDE OUT 2 NAMETAG
Click here: https://bit.ly/3RNvjiq
Click here: https://bit.ly/3TNClnc
Click here: https://bit.ly/3RNvp9M
Click here: https://bit.ly/3SaobNl
Click here: https://bit.ly/4ctrveY
0 Comments